Retrieving data from a SharePoint list
You can easily retrieve data from any SharePoint list by using a List Statement.
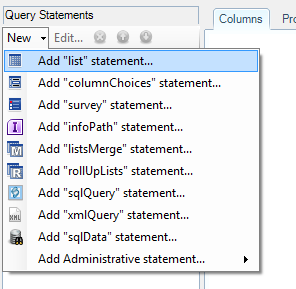
- Click on the “New” menu item inside the “Query Statements” panel.
- Click on “Add list statement…” to add a new list statement.
- The first step is to enter the relative site URL of you SharePoint site containing the desired list. You may either enter the URL or select an existing data source variable that would contain the correct URL. Then, click on the “Get Lists” button in order to retrieve all the lists of this site. Once retrieved, you can filter them so that you easily find the correct one.
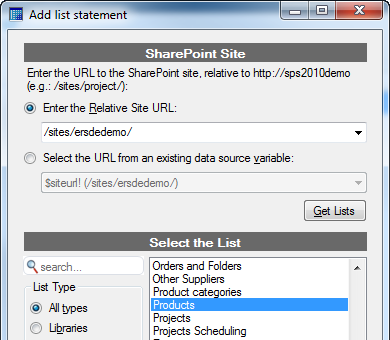
- Select the desired list(s) and click on the “Add” button
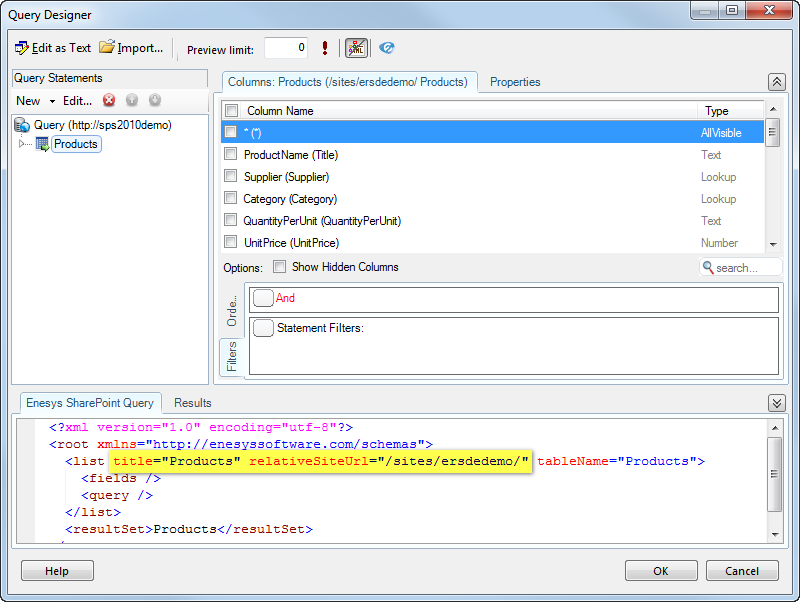
The Query Designer will automatically create the query string for you. When adding a List statement, the default behavior is to retrieve all items for all columns from the specified list. As you will see, you can be more specific about the data to retrieve from the list (columns, conditions…).
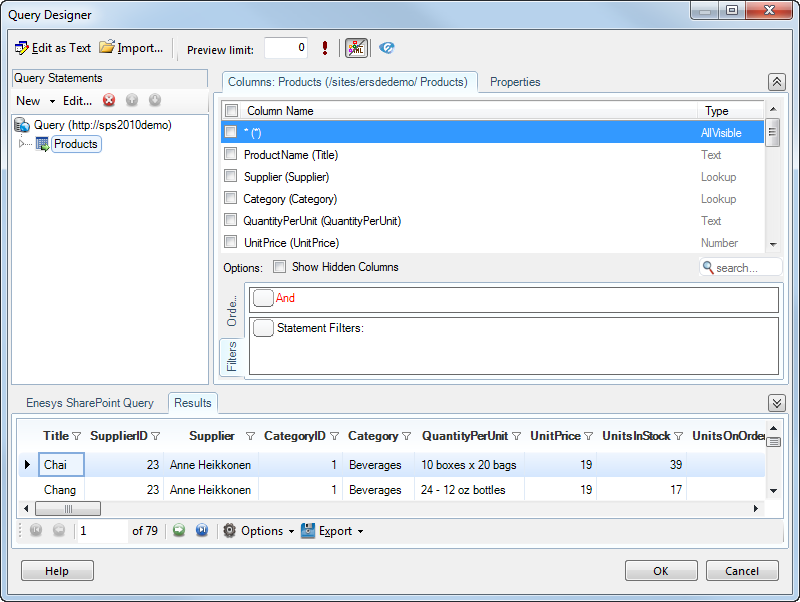
You only need to run the query and retrieve the list items:
Specifying list columns
Section titled “Specifying list columns”You can specify the columns you would like to retrieve using the Columns tab.
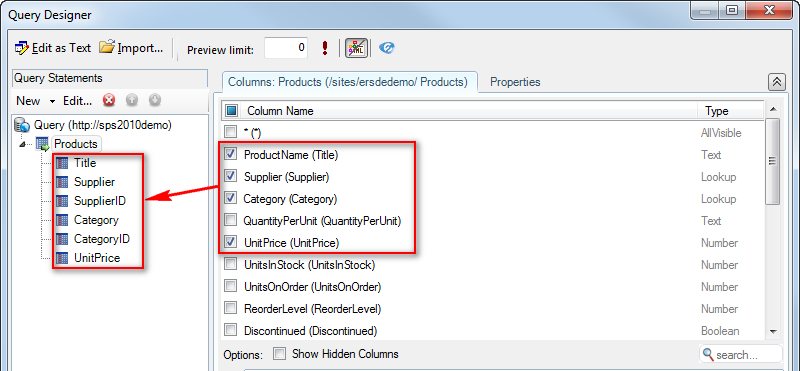
Instead of checking each column box, you can check the ‘*’ box for retrieving all non-hidden fields from the specified SharePoint list.
Leaving all boxes unchecked will return all columns from the SharePoint list, including hidden ones.
Note
It is recommended to specify the exact columns you need in your query. Not only it will perform better but it will also avoid possible unwanted side effects.
Indeed, with both Reporting and Integration Services, the columns will serve as the basis for specifying the data retrieved. The schema definition stored within the report or package is static and all the columns specified need to exist when you execute your report/package.
By specifying all columns or all non-hidden columns, your schema will contain all columns (or non-hidden columns). At a later time, if some unimportant column is deleted from your SharePoint list, your report/package will not work anymore even though you were not using the deleted column in your report layout/package flow.
Filtering list items
Section titled “Filtering list items”In order to filter the items retrieved by the list statement, filters can be applied by using the Filters tab.
Filtering at the list level is not your only option. You can also filter using a SqlQuery (see later in the documentation) statement or even at the report level using Reporting Services features. For more complex queries, it is not always possible to apply a filter on a single SharePoint list. You can use a mix of those filtering options as necessary.
As a rule of thumb, you should filter at the List level whenever possible. Enesys RS Data Extension will generate CAML filter that SharePoint can use to filter items before returning them. This will improve the performance considerably in most cases.
Adding Conditions
Section titled “Adding Conditions”In order to add a new condition, click on the menu button next to the “logical operator” (And / Or) inside which you want to add a new condition, and click on the “Add new condition” menu item:
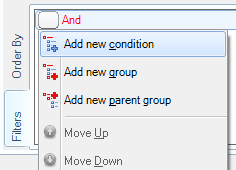
The new condition is added at the end of the specified group.
Setting Condition Properties
Section titled “Setting Condition Properties”Selecting the Field
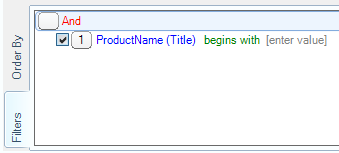
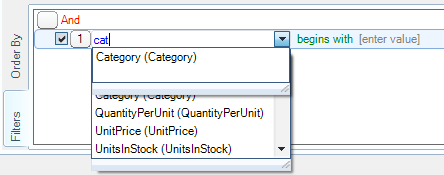
Section titled “Selecting the Field”In order to select the field on which the condition will apply, a drop down list is available with support for auto complete. You can either select the field inside the available fields, or you can start typing the field internal or display name to filter the fields list as shown in the following screen shot:
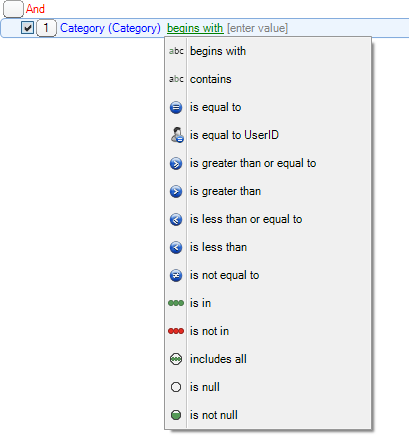
Selecting the Operator
Section titled “Selecting the Operator”A large range of operators is available to design specific filters as shown in the following screenshot:
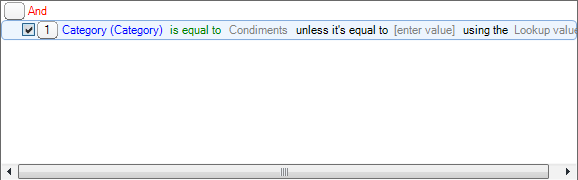
The following condition will retrieve items where the Category column is equal to “Condiments”:
Conditions options
Section titled “Conditions options”Filtering with the lookup ID
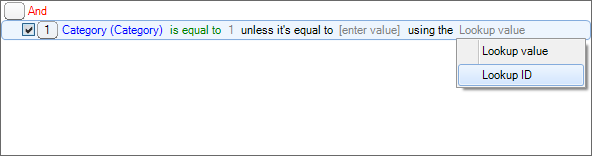
Section titled “Filtering with the lookup ID”When filtering on lookup columns, you can choose to filter either on the lookup value (the default) or on the lookup ID.
Click on “Lookup value” to change the selection to “Lookup ID”:
Including the time inside date comparisons
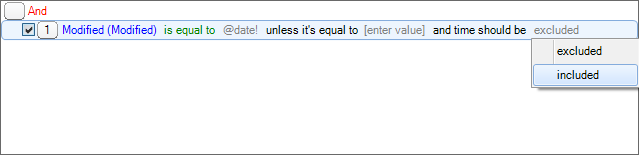
Section titled “Including the time inside date comparisons”When filtering on date columns, you can choose whether to include or not the time as part of the comparison. By default, the comparison only takes the date part into account:
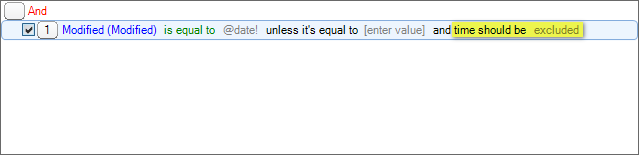
Click on “excluded” to change the selection to “included”:
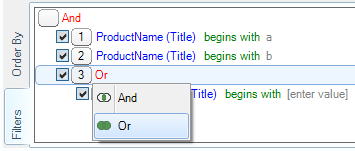
Adding Groups of Conditions
Section titled “Adding Groups of Conditions”Groups are used to combine multiple conditions using either And (all conditions apply) or Or (any condition applies) logical operator.
Adding Inner Groups
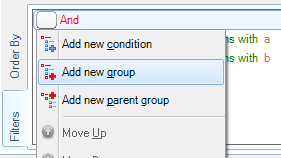
Section titled “Adding Inner Groups”In order to add a new group, click on the menu button next to the Group inside which you want to add a new Group, and click on the “Add new group” menu item:
The new group is added at the end of the specified group, along with a default condition:
Note that, if the current group is an “And” group, an “Or” group will be created, and similarly, if the current group is an “Or” group, an “And” group will be created.
You can change the group type ( Or / And ) at any time by clicking on the group:
Adding Parent Groups
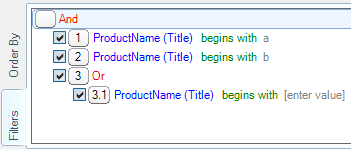
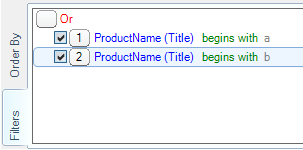
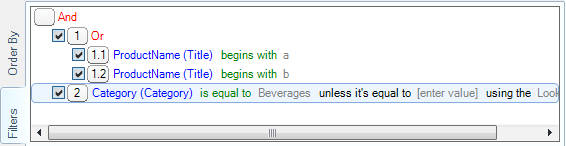
Section titled “Adding Parent Groups”It may be practical to add a parent group. For example, you have the following query, where you want to retrieve the items which Title either begins with “a” or begins with “b”:
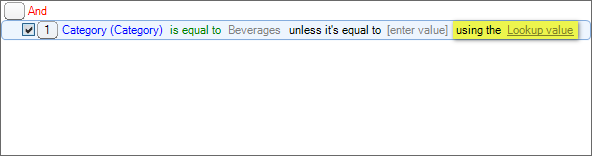
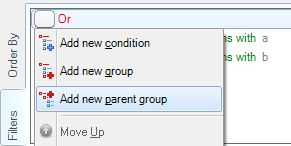
But you realize that you also only want items which Category is Beverages. Click on the “Or” group and add a new parent group:
A new “And” group was added as a parent of your existing “Or” group:
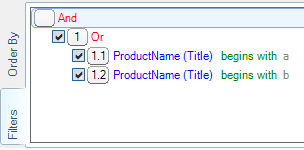
Now, you just need to add a new condition inside the “And” group to filter on the Category:
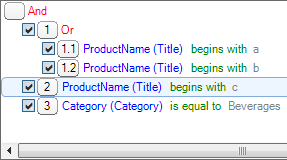
Moving Conditions/Groups
Section titled “Moving Conditions/Groups”It’s possible to move the conditions and groups inside the query.
The conditions/groups can be moved up and down inside a specific group:
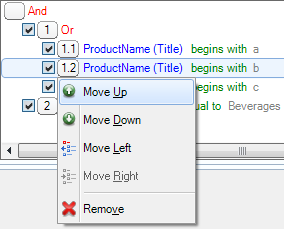
Even if the order of the conditions doesn’t matter, it can be interesting to move up and down conditions if you want to move them left and right just after.
You can also move the conditions/groups left and right:
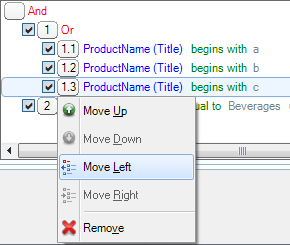
When moving left a condition, the condition becomes a sibling of its parent:
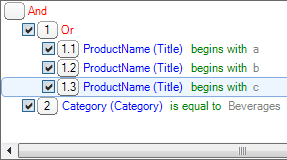
And, it’s the opposite when moving right a condition/group:
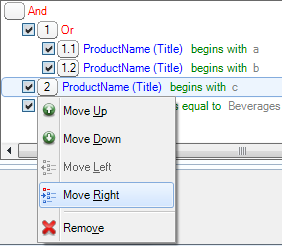
The condition becomes a child of its previous sibling (only if the previous sibling is a Group):
Filtering items based on another statement data
Section titled “Filtering items based on another statement data”Starting with Enesys SharePoint Query 3.8, list statements supports filtering data based on the results of another statement.
The “statement filter” is converted into a CAML query, which is applied before the data is returned from SharePoint. This results in performance improvements in most cases, especially when retrieving few items from a large list.
For example, if you need to retrieve all Issues assigned to some conditionally retrieved users:
- Add a list statement on the UserInfo list that retrieves the users (with necessary filters).
- Select (at least) the ID column from the UserInfo list.
- Add a list statement on the Issues list
- Add a new filter that specifies that the AssignedTo values should be taken from the results of the UserInfo’s ID column:

Items are filtered based on the specified filter:
Note that the “statement filters” are currently limited to a single filter. If you need to filter data from 2 or more result sets, we would recommend you to specify the one that filters out the most data, and then join your lists using a sqlQuery statement.
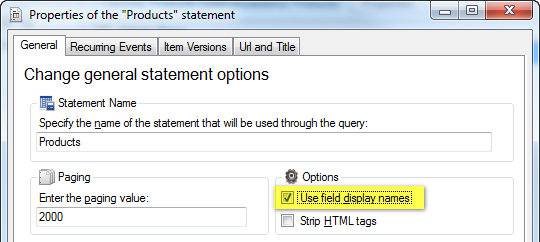
Using column display names or internal names
Section titled “Using column display names or internal names”SharePoint list columns have an internal name and a display name. When a column is initially created, the display name and the internal name of the column are the same (except if the name contains space or accent marks). When you modify the name of a column, it will only modify the display name. The internal name is never modified and you may end up with columns whose internal names no longer have any connections to the display names.
You can choose to use display names when specifying columns to return by setting the useDisplayName attribute to true.
Note
We recommend using internal names rather than display names. It has the advantage of not breaking your queries when a column name is changed. This is something that can easily happen with SharePoint lists.
Using parameters
Section titled “Using parameters”Parameters may be used in various ways in the context of Enesys SharePoint Query (attributes, query…). A parameter is composed of a name surrounded by the characters @ and ! (e.g. @product!) .
The following example shows how to return the data from the SharePoint “Products” list whose category is equal to the value of the “cat” parameter. The parameter will be replaced by the corresponding value when the report/package is executed.
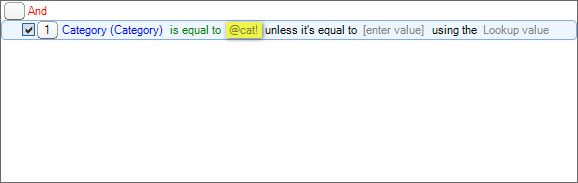
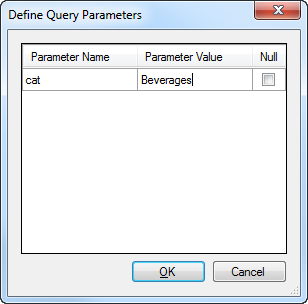
When running the query inside Enesys SharePoint Query Designer , you will be asked to enter the value of the “cat” parameter:
Multi-value parameters are supported. However their use only makes sense in the following constructs:
sqlQuery statement with an IN clause:
Section titled “sqlQuery statement with an IN clause:”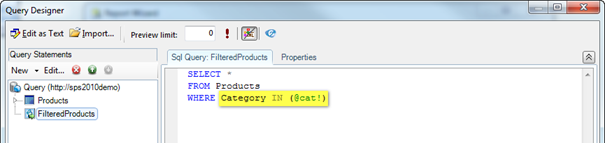
Pseudo CAML Query In operator:
Section titled “Pseudo CAML Query In operator:”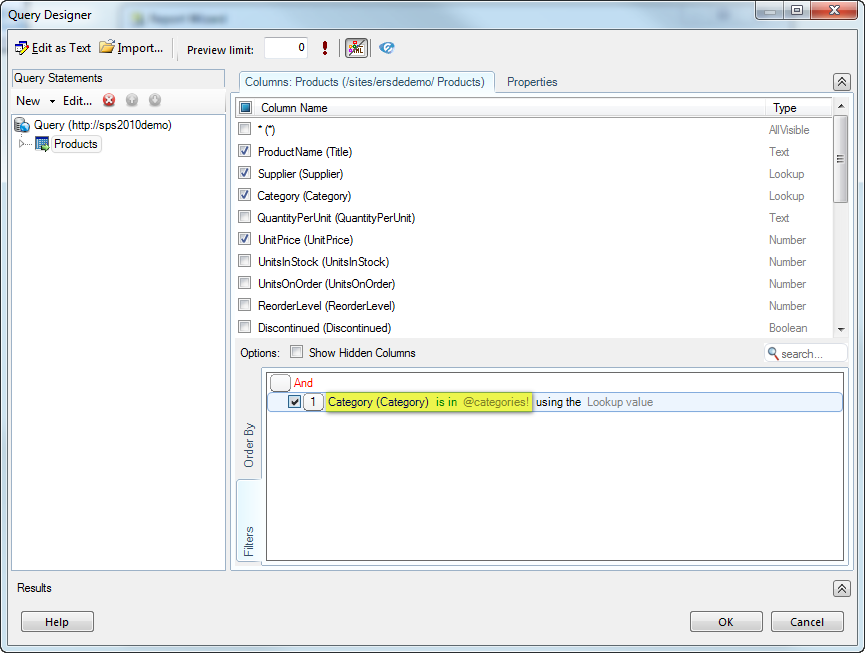
The value of the filter element from the rollUpLists statement:
Section titled “The value of the filter element from the rollUpLists statement:”
Using data source variables
Section titled “Using data source variables”Starting from version 3.2, Enesys SharePoint Query supports variables at the data source level. Variables are limited to the title and relativeSiteUrl attributes inside the list , survey , infoPath , rollUpLists and mergeLists statements, and the connectionString element inside the sqlData statements.
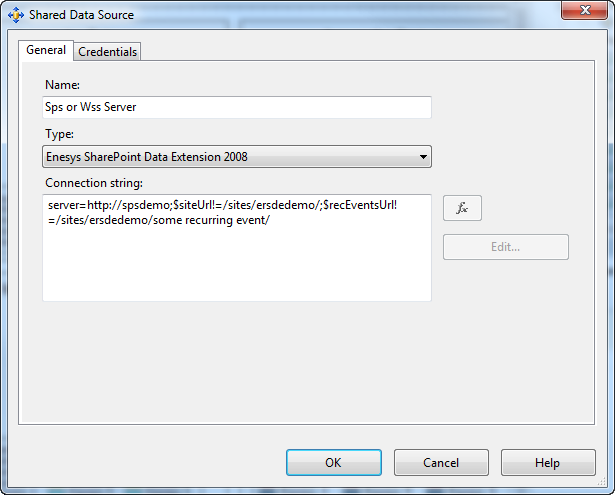
Data source variables are variables that you define in the data source connection string. A data source variable is composed of a name surrounded by the “$” and “!” characters (e.g.: $siteUrl!). The following screenshot shows a shared data source connection string that defines two variables (siteUrl and recEvensUrl). The values of those variables are respectively “/sites/ersdedemo/” and “/sites/ersdedemo/some recurring event/”.
What’s the point of using data source variables?
Basically, it will let you parameterized the relative site URLs used for any number of reports and makes it easy to point your reports/queries to a new server/site by simply changing the value of the data source variables instead of going through each report and change the relative site URL. Here are some scenarios that are a good fit:
You would like to move your reports to another server and the site structure is not exactly the same (the relative site URL used in your queries need to be changed).
You would like to change the URL of your site or move your site (the relative site URL used in your queries need to be changed).
You would like to execute your reports over some test site/server that does not match the hierarchy of your current execution context.
Do not confuse data source variables and report parameters. Report parameters are resolved at run time. Data source variables are resolved at design time. Their intent is quite different.
The rest of this chapter will describe how you can use the data source variables in combination with Enesys SharePoint Query Designer .
Using a variable in the relativeSiteUrl attribute
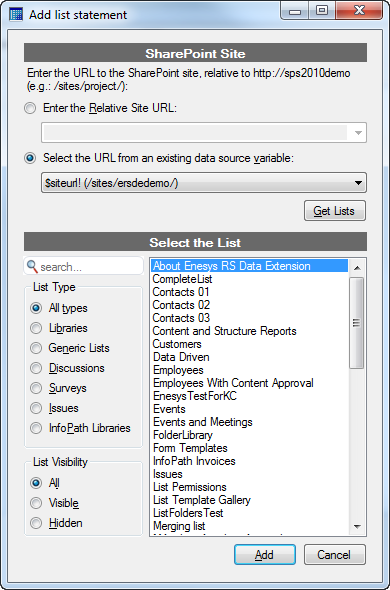
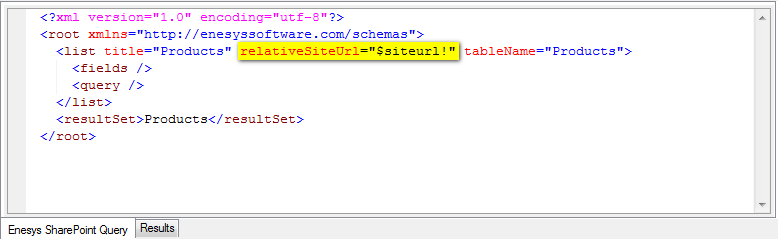
Section titled “Using a variable in the relativeSiteUrl attribute”When adding new list , survey , infoPath , mergeLists or rollUpLists statements, you can select a variable for specifying the relative site URL:
By doing this, your query will use the “$siteUrl!” variable in the relativeSiteUrl attribute instead of the relative site URL specified as a literal value:
Using a variable in the title attribute
Section titled “Using a variable in the title attribute”You can also use variables instead of literal values in title attributes.
Considering that I already have a variable “$list!” that is equal to “Products”, we will show how to add a list named “Products” and replace its title by “$list!”.
- In the “Add List Statement” form, select the “Products” list and add it to your project.
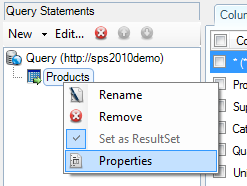
- Right click on the Products list and click on the “Properties” menu item
- Go to the “Url and Title” tab, and inside the “List Title” group, you can choose that a variable is used for specifying the title:
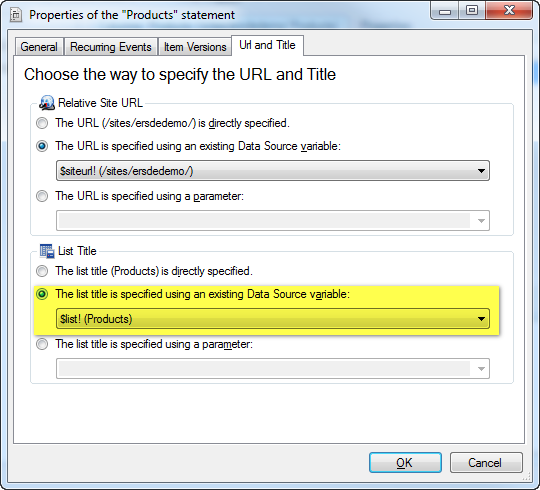
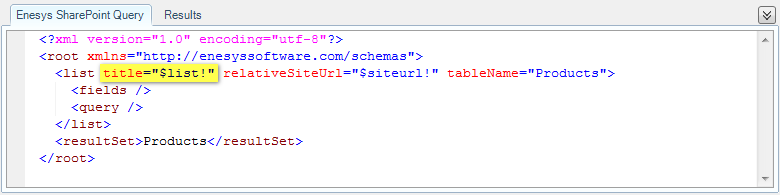
- Once validating, the query uses “$list!” in the list title :
As you can see on the “Url and Title” tab page inside the Properties form, you can easily revert to a literal value, or even specify that you want to use a parameter for your value.
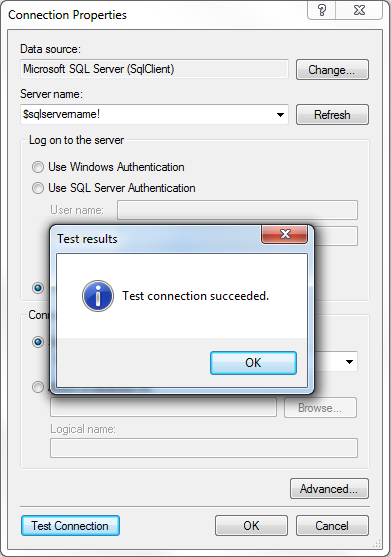
Using variables inside the sqlData’s Connection String
Section titled “Using variables inside the sqlData’s Connection String”Starting from version 3.5, you can specify data source variables inside the sqlData Connection String.
Given the fact that you have specified a $sqlservername! variable with a correct SQL Server name, you will be able to use inside the “Connection Properties” form instead of specifying the server directly:
Note
The variables are not limited to the “Data Source” property; you can use it in any property. You can even assign a single variable (that contains the necessary properties and their values) to the connection string. However, in this case, you won’t be able to edit the connection string using the “Connection Properties” form.
For more information, please read the “ESQ_sqlData_statement” chapter.
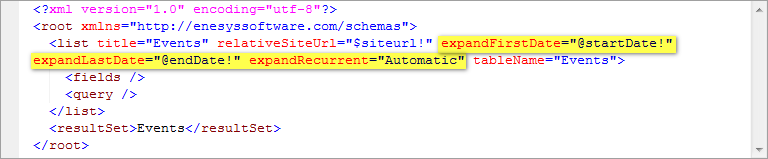
Expanding recurring events
Section titled “Expanding recurring events”The expandRecurrent attribute lets you expand recurring events for an event list.
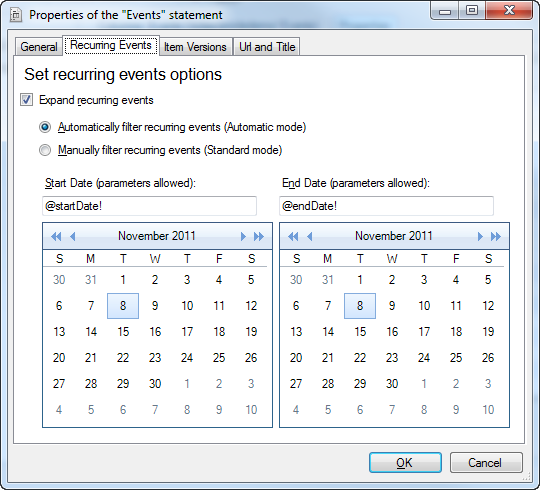
The expandRecurrent attribute goes along with expandFirstDate and expandLastDate required attributes that lets you define the range of dates for which recurring events will be expanded. Parameters may be used to set expandFirstDate and expandLastDate values.
The expandRecurrent attribute possible values are:
- Automatic : retrieves both recurring and non-recurring events for the date range specified by the expandFirstDate and expandLastDate attributes
- Standard : retrieves all events according to the CAML query and expands the recurring events for the date range specified by the expandFirstDate and expandLastDate attributes.
- None : retrieves events without expanding recurring events
In order to obtain events between two dates including the recurring events, you would set up the following query, using the “ Automatic ” mode:
The “ Automatic ” mode is the easiest way to retrieve events (both recurring and non-recurring events) for a given date range. Unless you have a very specific scenario, you will mostly use this mode when retrieving events from an event list.
Note that all events overlapping the specified date range are taken into account. If you only want to discard the overlapping events, you must add a sqlQuery statement as shown in the following picture.
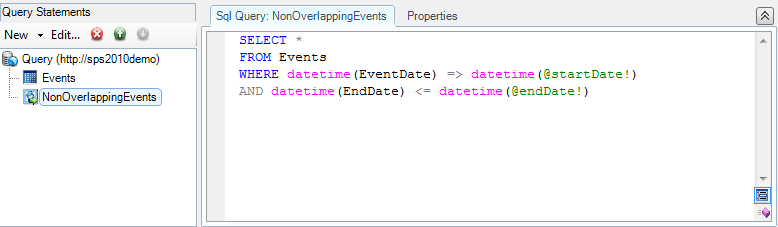
Query:
SELECT *FROM EventsWHERE datetime(EventDate) >= datetime(@startDate!)AND datetime(EndDate) <= datetime(@endDate!)Stripping HTML Tags
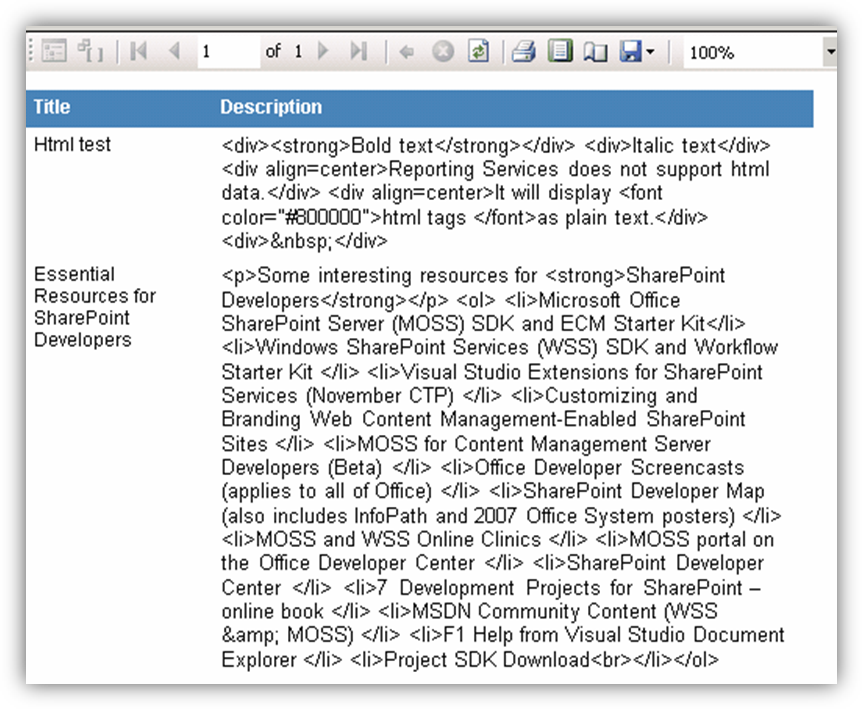
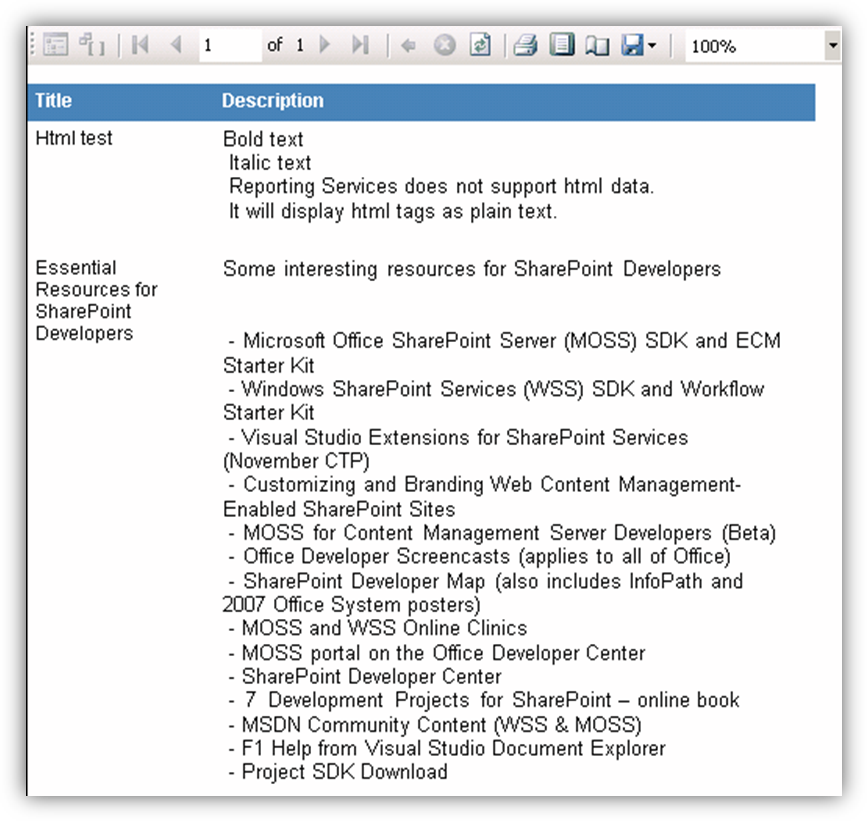
Section titled “Stripping HTML Tags”It is a well-known limitation that Reporting Services 2005 (this is not the case anymore with SSRS 2008) is not able to handle HTML tags within a specific field. Thus, HTML data within a field will be displayed as plain text as shown in the following image:
Though, you may use your own approach to remove HTML tags by using Reporting Services embedded code features, we have added the ability to strip HTML tags for a specific SharePoint list using the stripHtml attribute:
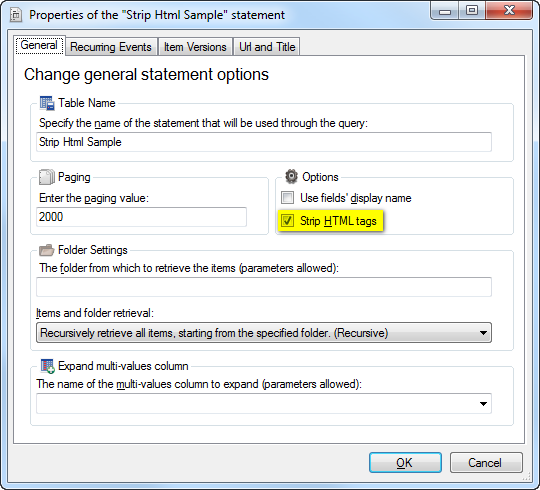
Though not really appealing, stripping html makes text at least readable:
Note
SSRS 2008 is able to render HTML tags (a subset). In most cases, this feature should not be necessary if you are using SSRS 2008 or later.
Items and folders
Section titled “Items and folders”The default behavior when retrieving items using a list statement is to return all items within all folders and subfolders. You can override this behavior by specifying a value for the optional folder and viewScope attributes.
The folder attribute lets you specify the folder name from which the items will be retrieved. When not specified, the root folder is the default value.
The viewScope attribute lets you specify which items will be retrieved. Valid values are:
- Default : retrieves only the files and subfolders in a specific folder (default value when a folder is specified)
- FilesOnly : retrieves only the files of a specific folder.
- Recursive : retrieves all files of all folders starting from the specified folder (default value when no folder is set)
- RecursiveAll : retrieves all files and all subfolders of all folders starting from the specified folder
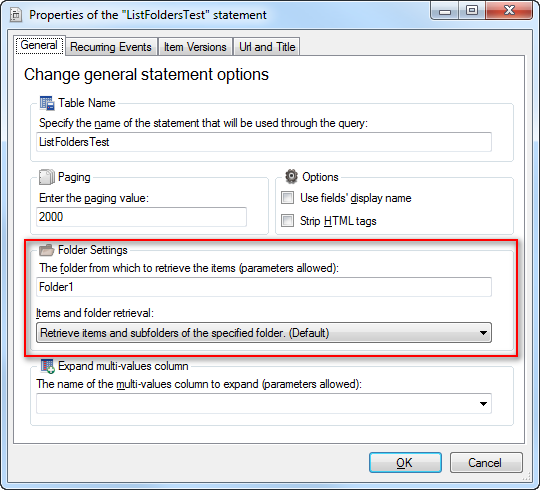
When specifying a folder attribute, you will retrieve items located in the specified folder as well as subfolders as shown in the following screenshot:
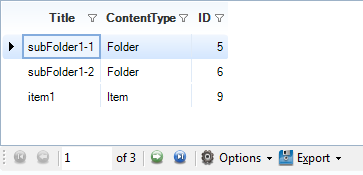
To retrieve root items and folders, set the folder attribute to a “/” (slash) value.
Instead of specifying the folder using a literal value, you can use a report parameter (e.g.: folder = “@someReportParameter! ”).
If you want to retrieve all items and all folders, just leave the folder attribute empty and set the viewScope attribute to RecursiveAll .
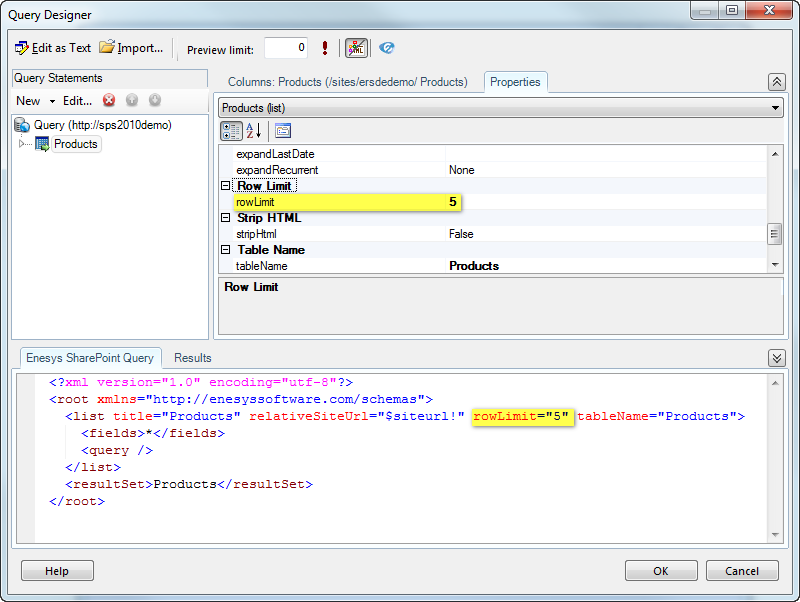
Retrieving the first n items of a list
Section titled “Retrieving the first n items of a list”The rowLimit attribute lets you specify the number of items to retrieve.
Paging
Section titled “Paging”The paging attribute lets you specify how many items at once should be retrieved from a SharePoint list. Enesys SharePoint Query will retrieve list items in chunks of the number of specified items by the paging attribute.
By default, Enesys SharePoint Query will retrieve items from a SharePoint list in chunks of 2000 items. However, if you want to put less pressure on your SharePoint server, especially if you are retrieving a large number of columns, you may want to specify a lower number.
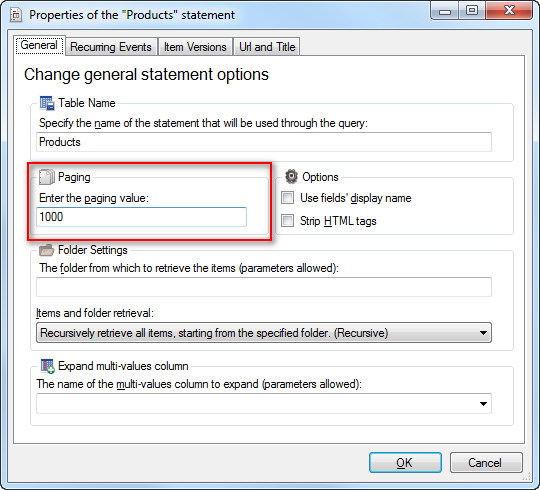
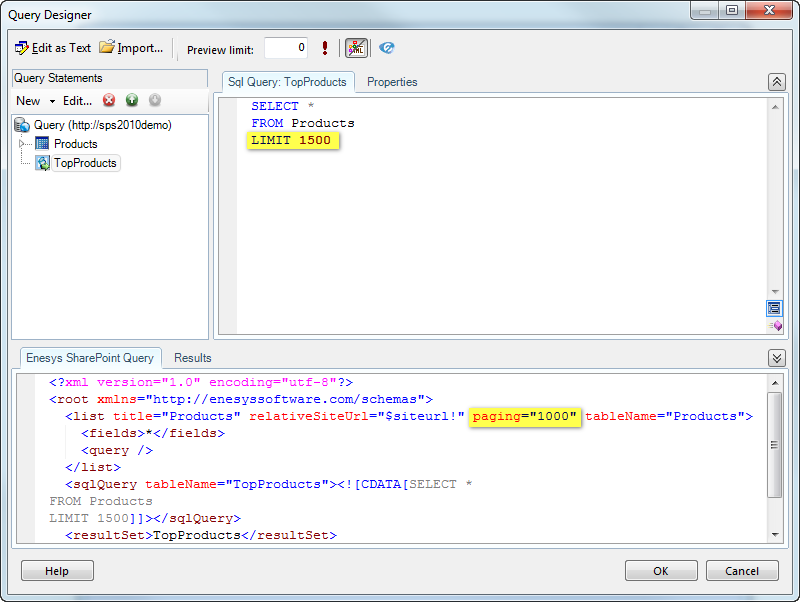
Please note that the paging attribute overrides the rowLimit attribute. Therefore, it is not possible to specify a rowLimit attribute when specifying a paging attribute. It is however possible to mimic the rowLimit feature at the list level by adding a sqlQuery statement as shown in the following sample that shows a query returning 1500 items from the product list:
Custom separator for multiple values columns
Section titled “Custom separator for multiple values columns”The following type of SharePoint columns may have multiple values:
- Choice
- Lookup
- User
- Attachments
By default, multiple values will be separated by a comma. You may specify your own separator by setting the multiValuesSeparator attribute value like shown in the following screenshot:
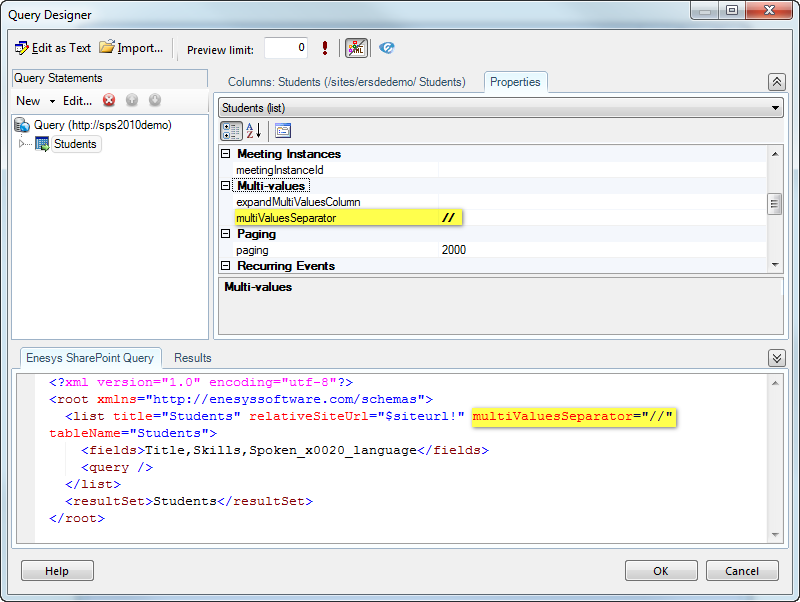
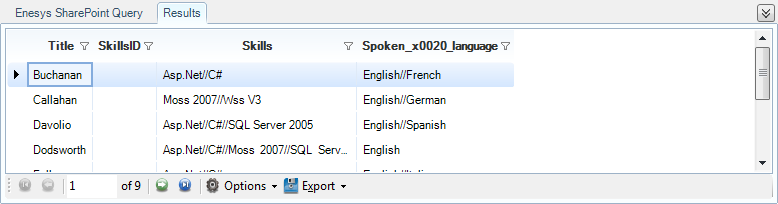
By running this query, you will get each student skill and spoken language separated by two slashes as shown in the following screen shot:
Expanding multiple values
Section titled “Expanding multiple values”Retrieving multiple values separated by some separator will not help if you would like to group items based on the possible values of such a column.
To address this scenario, it is possible to duplicate items for each value stored in the desired multiple values column as if you were doing a “Join” with those values. The desired multiple values column is specified using the expandMultiValuesColumn attribute as shown in the following screenshots:
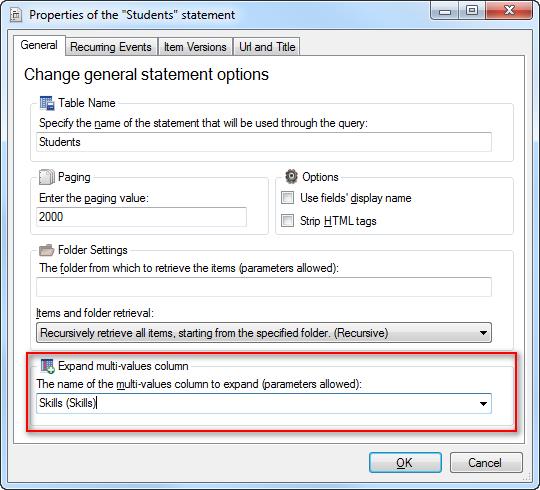
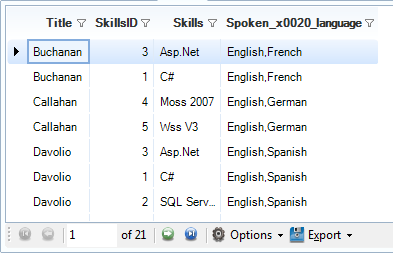
By running this query, the “Skills” column (which is a lookup column accepting multiple values) will only get one value for each student. On the other hand, students are duplicated accordingly to reflect each skill as shown in the following screenshot:
Without using expandMultiValuesColumn attribute, you would retrieve items in the following form:
Rather than specifying the column to expand as a literal, you may use a report parameter (e.g.: expandMultiValuesColumn =“@ChoosenColumn! ”).
Note
Be aware that items, being duplicated (somewhat like a join operation), some calculations may not be appropriate when building reports using this approach.
Retrieving attachments
Section titled “Retrieving attachments”Starting from version 2.1, the URLs to the files that have been attached to a specific list item are available through the “Attachments” column. Prior to the version 2.1, the “Attachments” column was only returning the number of attachments.
Multiple attachments will be separated using the separator specified by multiValuesSeparator attribute or a comma if the attribute is not specified.
When you would like to display individual attachments in a report and possibly allow the user to click on the attachment for displaying the associate file, you may set the expandMultiValuesColumn attribute value to “ Attachments ” as shown in the following screenshot:

Retrieving user information
Section titled “Retrieving user information”It is possible to retrieve information about users in a site collection by using the UserInfo list:
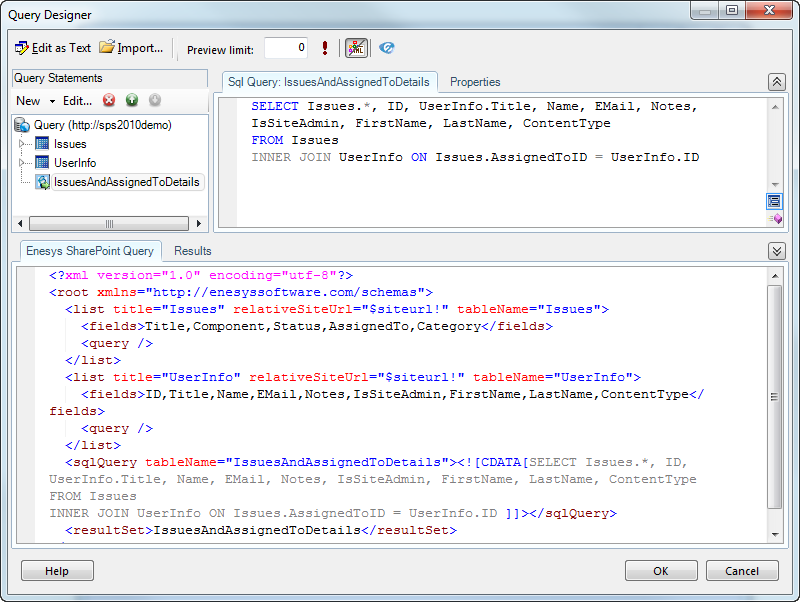
One interesting use of the “UserInfo” list is to join it to some other list in order to get more details about users specified using a “Person or Group” column.
The query shown in the following screenshot will join an Issue list and the “UserInfo” list based on the user assigned to the issue:
Retrieving item versions
Section titled “Retrieving item versions”Starting from Enesys SharePoint Query version 2.1, it is possible to retrieve item versions using the itemVersions attribute.
You can either retrieve all versions, or a specific number of versions. The following screenshot shows how to retrieve all versions of items from SharePoint “Issues” list.
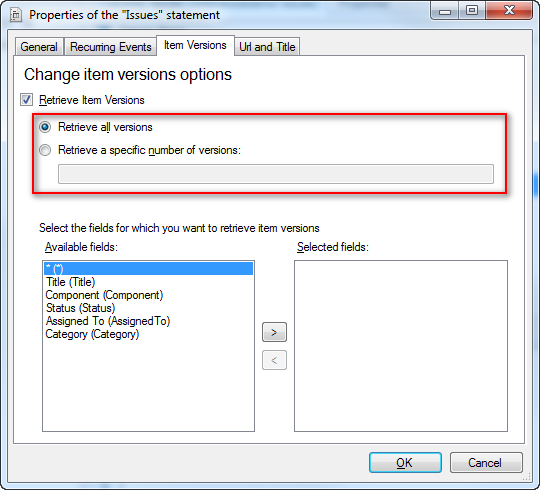
Specifying the item version fields
Section titled “Specifying the item version fields”Starting from version 3.5, you can specify the fields for which you want to retrieve item versions. This lets you improve the overall performances when retrieving item versions.
Open the Properties form and go to the “Item Versions” tab. You can now select the fields for which you want to retrieve item versions:
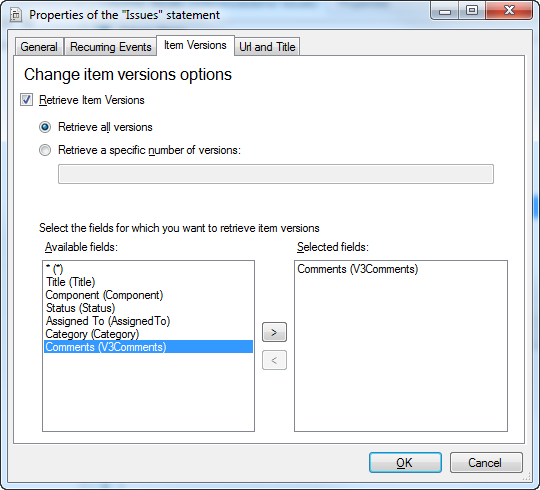
Please note that only currently selected fields are displayed inside the “Available fields”. If a field doesn’t appear, you need to select it before being able to select it for item versions retrieval.
Note
Due to SharePoint Web Services limitations, retrieving item versions is a very time consuming process. In order to improve performance, it is recommended that you explicitly specify the fields for which you need to retrieve item versions instead of relying on the default behavior which is to return item versions for all the selected fields.
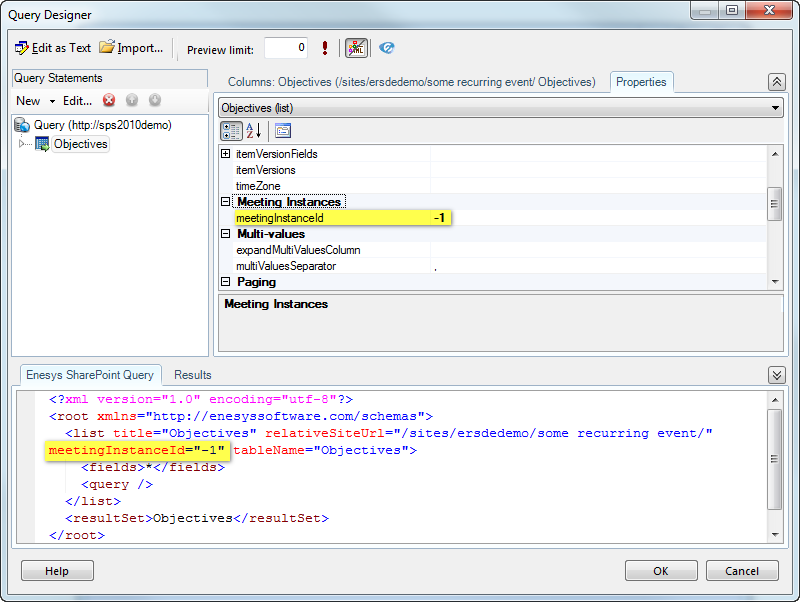
Retrieving meeting instances
Section titled “Retrieving meeting instances”When retrieving items from lists within a meeting workspace, you may specify the meeting instance for which you would like to retrieve items.
To retrieve items for all meeting occurrences, you can set the meetingInstanceId attribute value to “ -1 ” as shown in the following screenshot:
Distinct items
Section titled “Distinct items”When retrieving items to fill the possible values of a parameter, you will probably need to retrieve distinct items from your list.
While it’s possible to add a “SELECT DISTINCT …” sqlQuery statement to your query, starting from the version 3.8, Enesys SharePoint Query allows you to directly return distinct items from your SharePoint list.
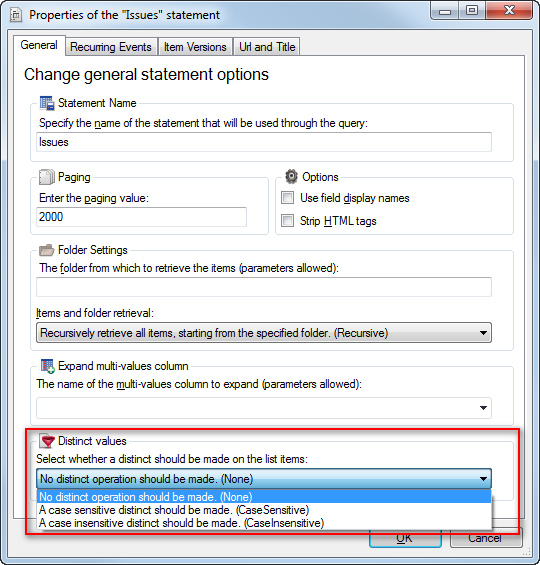
When doing a case sensitive distinct, “Word” is different from “word” or “WORD”, and similarly with non-ascii letters, “буква” is considered different to “Буква”. Several items are returned for each different case.
When doing a case insensitive distinct, “Word” is considered equal to “word” and “WORD”, and similarly, “буква” is considered equal to “Буква”. A single item is returned for all different cases.